Showing posts with label zbrush. Show all posts

17.1.14

Finished Character

So the day of submission comes and I'm sort of done with the practical. As always there's a lot of room for improvement but here's the over all of the project. 
I'm not entirely happy with the end result; some of the aspects that I would like to work more on is the textures (specially on the hair and eyes), good rig, blend shapes and some animation. 
I did manage to rig the character, but got stuck on the weight painting as I managed to lock the weights and I wouldn't modify it... probably did something wrong buy it was taking me a lot of time to fix it. Blend shapes seemed pointless if the character was in a still position. 
For the textures, it's harder to make them than it looks; on Maya they look one way, Unity3D another and UDK another. The hair look fine on Maya but the eyes didn't and the other way around on UDK. It becomes a bit of a try and error, quite time consuming. Next time I'll be trying the textures only on the final engine that it will be render at. 

Speaking of engines, quite disappointed at Unity at the moment and really looking forward of learning some UDK. The quality of the real time render is far superior on UDK and it pretty much makes everything look pretty. This is the final video for the turn table of Arnold. It was done real time, I just capture the screen video.

The baking of the normals are not perfect, this is the first time I've try Zbrush, topogun and xnormal, so there's a lot to learn, but I'm really happy that I finally got to try them and lose the fear of their interfaces. Next time, I'll work on separate parts of the body and bake separate normals. Also I'll avoid making a single mesh for the entire body, it would probably been easier to keep different polygon count on each part. 
I really like the process and it's fascinating to see how many changes can happen as you go along, depending what works best on paper and what works better on 3D. Looking forward to polish this and make new ones, but faster this time. 
Any feedback would be more than appreciated. 

Hand in time! 


7.1.14

Clothing details

After spending weeks and weeks focusing in getting the face right I noticed that the body was made, but not polished at all.
I started re-sculpting pretty much everything because by this point I was more used to zbrush and its interface. 
I started to get some ideas of the type if materials I wanted for each part of the clothing but because I really wanted to go into detail I had to look for close up references of stuff like the type of stitching and seams I wanted to go for. I found that a good place to look for this kind if references where clothing shops online where you can not only see every angle, but you can also zoom in when you place the mouse over (pretty much I used YesStyle).
For the top vest I wanted it to be all leather with some 'cushion' parts on the sides. The logo I've been using to 'brand' my project is an eagle-type logo which I want to include somehow in the clothing so I'll probably put it as a decorative symbol in the back. 
Something I realised I didn't took in consideration when I originally drew the design was "how is he going to take the best off?". Not that he will, but part of the topics I wanted to touch on my essay was the believability so I couldn't let this little details pass by. I had to add an extra feature on the front where he could tide it up. Didn't go for a zipper because of the style I wanted to achieve so I used laces as if it was a corsette. 
Things that I never thought I've be looking up such as types of stitching for different kind of materials certainly became a priority. This only made me realise how little attention I've been paying to my surroundings.
At this point I also discovered a very easy technique to simulate cloth within Zbrush that I will probably be using for the baggy shirt. Also the boots required a bit of attention as the integration of parts of metal weren't so common to find in other items. 
I thought that adding the details was going to be laborious and repetitive, but luckily is incredibly easy to work out how to create stencils, brushes and alphas that can convert the stylus into a sewing matching :)

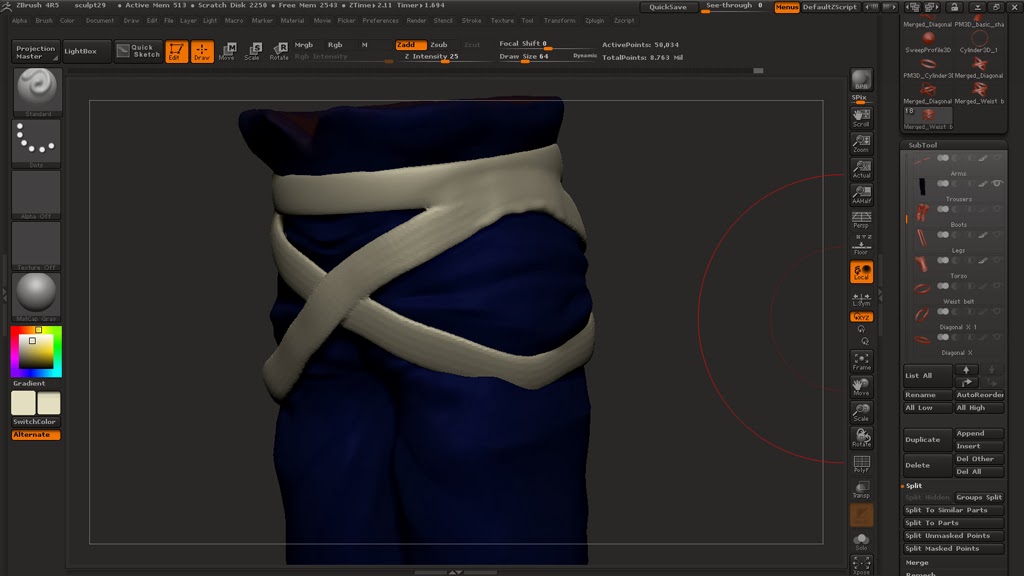
These are some screen shots of the details on most of the clothing. The next process will be retopologyising everything (probably everything in one single mesh). Hopefully the details will look good on the normal maps.
Vest:


Straps: (I had to retopologised them early on to get the sharp edges). 


Gloves: I added some extra details that weren't on the original concept 


Shirt: 


Boots: I didn't like the original concept at, so before I took it to any details I ended up changing them pretty much entirely. 


This is the detail on the back of the vest. I'm planning to use that 'eagle' as the logo of my project.


These are not final colours, it was just to block out the groups and get a rough idea. Polypaint is not something I planned to do as I'll be working manually on the textures after the UV's have been made. 


Retopology: Zbrush vs Topogun

After finishing sculpting the head I decided to jump straight to retopologising it and come back to finish the rest of the body later; mainly to try the entire process first and have a preview of the end result of the project.
I tried the retopologising tools in zbrush that involve modifying a zsphere vertex by vertex. The process was easy to grasp on, and the accuracy for the vertex to attach to the high resolution model was very good, although not being so familiar with the zbrush interface when it come to rotate or even pressing a key by mistake made this process a bit slow. 
When I finish the face I notice that my topology wasn't ideal. Not that I had big plans for facial animation, but if I wanted to imitate a next gen console character I had to stick with good topology. This are some screen shots from the process in Zbrush. 


I'm the many tutorial that I watch, at least half of them use a program called Topogun which like the name suggest only focuses on retopologising. I went through a small tutorial just to show me the basics and luckily it was a very easy software. 
Even thought I had symmetry activated I noticed that it didn't work %100 as it should; there were minor mistakes it would make that would later on pile up if I didn't address them straight away. This process became somehow unpractical, so I decided to only do one side and later on mirror it in Maya. Certainly the fact that you can jump back and forth between reference meshes is quite handy specially when you have a very dense mesh. Probably this tool is more powerful and I'm not exploding it to the max, but I'll make some time in the future to get some extra tutorials and get the best out of it.
This are screen shots in topogun, quite an easy interface and makes what can be a boring process into a smooth and relaxing one.


10.12.13

Hai Phan - Freelance Character Artist


Hai Phan is an artist I came across when I was looking for tutorials that involved the entire pipeline. It was in CGCircuit that I found his videos and the fact that he wasn't going for a realistic approach but rather a really nice stylised that made it so appealing. 
His tutorials were helpful as he didn't approached a software specific but rather explaining the general concept and industry standards. 
Hella is the character he mainly worked with and it was amazing to see most of the process on the making. 
His portfolio is fascinating and quite extensive (have a look!); the amount of different characters and creatures that he creates varies a lot yet you can still sense a style within. 


Not only his videos were really accessible but it was really easy to get in contact with him and he was kind enough to answer some questions that will be useful as primary research for my dissertation. 


27.11.13

Tutorials, tutorials ... endless tutorials

Knowing that my dissertation is a blend of a tutorial and a case study, I had no option but to learn the pipeline as much as I could in a short period of time. At this point I got Photoshop or any other drawing softwares and techniques tamed for the purpose (maybe not to the standards I want, but they'll do the trick).
Maya as a 'put assets together' software I'm pretty sure I'll manage at my level. The problem was Zbrush; I've tried this software before and the interface scared me away. now that I tried to go back to it I decided to target it from 0. Started looking at tutorials on digital tutors and opted for taking the basic Introduction to Zbrush, a 6 hr tutorial to teach you the basics an also introduce you to some of the useful tools and functions that Zbrush has. After finishing those I started to look at some other such as Pipeline Integration with Maya and Zbrush and Creating Game Characters with Maya and Zbrush but the more I spend looking at this tutorials the less I felt I was practising. Looking at the 169 tutorials that Digital Tutors have ONLY for Zbrush was a bit overwhelming and thinking that I had CGCircuit tutorials to watch as well (recommend this one in particular) and other 13 GB of other random tutorials I found online. I felt for a second there was not enough time to watch them all even if I had double the amount of time to do it!
The amount of tutorials in Magazines and in some dissertations I was reading felt like it was just an endless and even found myself watching tutorials while having dinner :-/
For a while it was all I could think of until I broke down and decided to just crack on with work. I still ended up going back to some tutorials because I knew I could do things I just forgot how. I felt like I didn't target this process the best way; I should have been working along with the tutorials and pause them when needed, but at the time I thought they were going way to fast for me to catch up their speed (specially when they come with an amazing model and say 'I did this 3 months ago'...)
Hopefully this won't affect much of my practical work, but I am proud of managing to stand at least 26 hours of pure tutorials without perishing.


(yes...this is how horrifying it looks....and this are just from ONE website! )