Showing posts with label OUDF505. Show all posts

6.12.12

Time management = FAIL

For the final submission we had a massive problem: we had all the assets, we just didn't have the time to put the together.
Once again I failed to manage time and left post production a ridiculous short time. The music that Sophie found and the particles that Ryan made where really good and suitable for the project and it was a massive shame not to see them together. Like I mention before only the animation that Ryan did (first part) actually managed to be worked on with camera, colour correction, depth of field and bloom for the lights. It looked really well and it would have been a massive success if we actually managed to have it done on time.


We'll do our best to finish this in a good quality, as we hope to use this as part of our portfolio and we're also looking forward to have a decent presentation for the exhibition.

Animation - Iron Heart

Very last minute after having finished all the props and having everything in place, me and Ryan decided to focus on the animation while Sophie was finishing the textures for the scene.
I took the task to animate the second part of the animation that can be broken down as:

-Tabitha finds Albus
-Gets close to him
-Notices the key next to him
-Winds him up with the key
-Albus "wakes up" scaring her
-he stands up looking intimidating
-He asks for a second and turns around
-Tabitha is curious of what he started to make
-he turns back with a flower like object offering it to her
-She gets happy and accepts the flower

Unfortunately my part of the animation didn't get to be worked on unity with different lights and camera effects because of time constrains, so I'll just put a play last direct from Maya just to give an idea of my work.


The animation isn't perfect, it was made with little time and also the characters had a lot of restrictions with their movements, but for what it is, I'm really proud of it :-)

Cel shade for robots?

One of the ideas I had from the very beggining was to make the game with a cel shade finish.
Part of the reason was that some of the games that I recently played were Valkyria Chronicles for PS3 and the re-release of an all-time master piece: Jet Set Radio.

The gameplay it's completely different in both games, but the graphics have a same basic core. In the case of Jet Set Radio, it was the second game that ever used this technique, but certainly the one that pushed it to the maximum for the time and brought it up to the map. Now a days it might seem a bit outdated and most of the graphics seem blocky, but if people can tolerate to play minecraft then there's not issue with it.


This is an image of the main character in jet set radio rendered witout and with cel shade. Clearly there's a lot of personality added to the character just by outlining the geometry.


In a more modern game, obviously the amount of detail that can be added is much greater, but the among other filters, the effect of it being a cartoon, or in the case of Valkyria Chronicles an anime, it's still there.


Another reason why we thought of approaching this style was because the faces in the characters are just plain animated textures and using the cel shade would make everything fit just right. Unfortunately we weren't very happy with the results Unity puts by default, and didnt have time to actually look for other possible solutions as they might just make the process to go slower. 


Wind Waker textures analisis

When I was doing some research about making a cartoon style I came across with this thread on a Polycount forum where a user took a good time to "open" the game The Legend of Zelda: the Wind Waker and made a really good break down and analysis of them.


What caught my attention initially was just to see how professionals do textures but then it expanded to more helpful stuff of how to make scenes more efficient by adding baked shadows to the textures for scenes with no changes in the illumination and also something really iconic in the game where the particles.


There are also some libraries of assets that I found. All of them are cartoon style but it's surprising how iconic and similar the explosions look to this saga. 
You can check the rest of the post for more information. It breaks down a lot of secrets that where used to make this game a total jewel. 

Warehouse work and development

The original idea for the environment was to make it an attic where loads of unused robots where stored and that's when she would fin him. While developing this we decided to modify it into more of a ware house. A place where the robots are being made at the moment and there are prototypes everywhere.

When I was working on it on Autocad I started to notice that the scales where too simplistic and slightly realistic for the style that we were doing, so I split the place into two, a small attic like studio where the the first scene takes place.


This is an office type with a desk, chair, lamp and a few blueprints of some work. The place has wooden floor and nice wallpapers. On one side there's a metal door half way open where surveillance bot leads the girl to have a peek.
This leads to the second part of the scenario; a massive workshop like building that is under level of the previous room but at the same time it has a quadruple height ceiling. It is all surrounded by copper walls that have got rusted over time giving a multicolour shade.there are 4 main beams connected at the top and holding a balcony like there are several smaller pillars as support. Right in front of it, there a massive circular window, from which the main light comes in.

The plan is to have Albus lying there motionless and having this really strong light coming to him; this was with the porpoise of creating a really intense scene where the connection between the Albus and Tabitha is made.
Part of the emphasis is the hight of the ceiling also try's to remark on the importance of the bound of the scene and all I did was to try to create an environment that looks messy like a workhouse would be but still keeping a central focus on the character without getting lost in details.


Mothhead


Even after seeing the video of Unity 4 (butterfly effect) I wasn't sure unity had the flexibility that other game engines tend to show. I was looking a lot into trying UDK or Cryengine just to give it a go and hopefully make a personal project on it, but I was afraid to use them as I know very little about scripting and I know those software a bit less user friendly due to their complexity.

Luckily I fount this video online called Mothhead, which is meant to be a videogame as well, and the graphics are just amazing.
It clearly has a lot to do with the textures work, but it certainly reaches the quality of a mainstream game which really regain my hope on keep working on unity.

Mothhead is an interactive art demo built in Unity by San Francisco-based industry art studio Massive Black. Explore the beautiful dark and whimsical underground grotto as a moth, meet a new friend, and find your other physical half. Solve a simple puzzle allowing you to cross a chasm and make your way outside where you'll find yourself in a beautiful outdoor environment and be able to free a friend from captivity using a combination of brains and brawn. 

Interested? well check their website or check the video below in case you need more:


Hydraulics

One of the important parts for Albus movements were the hydraulic pistons included in both legs and arm.
The idea is that despite his movements, for cartoonish as they might be, they needed to be constrained to each other at all time to keep this feeling of being a mechanic character. Matt gave me a good idea to aim constrain them one another and, on its own, it was working just fine. The problem came when I had to constrain those constrains to parts of geometry that where already bond to the rig.


I found this very useful video online that basically takes you through a good way of not only make functional pistons, but also how to "cheat" by making an infinite constrain between the master and slave parts of the hydraulic part.


Skeleton of Albus

Rigging was not such a bit task as the robot had a simple structure, but the problem began when I had to bind it to the geometry.
I was told to try a rigid binding as it could work best for robot like movements, but no matter how much I tried I just couldn't get my head around it.
I ended up going for a soft binding and it turned out to be just fine, as I just had to do be very specific with the weight painting to avoid having organic movements.
Probably the part that made it a bit difficult was the fact that the character was not model in a T pose so the influence between the joint in the arm and right leg was creating a bit of confusion, but the character doesn't have a full arm extended so not putting him on a T pose from the beginning was part of the plan.


After weight painting, the joints were working smoothly but I discovered that there were some issues when the elbow would bend above one point. By the time I realised this issue the project was ready to start animation and going back to fix this small issue was probably going to delay the whole process. We opted to just make a note next to the model to let them know where to be careful in case someone else was to work with it in the animation process. Luckily, the movements of Albus did not require to bend his elbow to that extend.


A Slower Speed of Light


Something that always captivates me is when dynamic in game are just different from the others. Despite the fact that our cinematic is not playable and the amount of scripting that we put on it is limited I found this game that at first caught my attention because I thought the style was similar to ours. Turns out that the styles is not what this game is about; in fact this is probably not even a game itself. More than anything this is a test of how physics related to speed can alter the way a game looks and more than anything how the game play can be taken to a whole new level, and it's is done surprisingly in Unity.
I remember back in high school I was really interested in physics, but I always got disappointed as there weren't many creative ways to apply it (back in t he days) but now seeing how wonderful things can actually manage to work in an amazing way it gives me hope to actual someday work mathematically to create something artistic.

Check the website and possibly try it out :) 


5.12.12

Manga Society - Thought Bubble

So everyone is allowed to have a hobby or guilty pleasure, and mine is to read manga. Despite the fact that I don't do it so often now a days because it can be quite expensive, I quite enjoy going with some friends to the Manga workshop, part of the anime society at Leeds University.
Last year I attended but didn't really do much there, but this year I decided to go for it as there was a more ambitious project of making a comic/manga in a short period of time and get it published to present it at the Thought Bubble event that took place on the Royal Armouri Museum in Clarence Dock, Leeds this last 17th and 18th of November.

Now I didn't have time to really come up with an original concept so I thought I might as well use the our concept and develop it in a different way. Many films are based on comics now a days, and seeing that our storyboards weren't very polished I went in with it and made a 4 comic.
The time for it was pretty short, and on top of that I had the rest of the stuff to model, so it was probably not very smart of me to get into this kind of commitment, but it was a nice experience to see it published (and we actually sold all the copies).


 So the quality is not up to professional standards, but it was a lot of fun to make it and I also realized how hard it is to plan panels and the flow on between pages. Also another good part of this is that I got my hands on a software called Manga Studio, which helped me to make the panels and the screen toning. This is clearly not the full potential of the software, but I have to say if I didn't master it because of the speed on which I had to work at the end, at least I understood a great part of it. It might not be a very useful tool for the course, and I probably shouldn't have been spending my time doing this, but that's why it's called guilty pleasure I suppose...  please don't judge me

Moving Alien

Having started our own project, I really didnt wanted to waste time on making a decen texture for the alien, so I apologise for it.
Also the unity file from which I worked to make a web version on the turntable of the alien went corrupted for some reason, and all I could do at the moment is to put a playblast of the small idle animation I made.
Bare in mind that I did this in matter of a few minutes during class and it was all because we wanted to try the scripting on Unity that would allow us to play different idles in a random way, just to show a variety of expressions of the character.
(I'm so sorry you had to watch this) I probably bring shame to the college by showing this, but I promise the animation for our own project will be of much better quality; this was only a quick test.

Ni no Kuni


Another game that inspire me for the process was the upcoming Ni no Kuni for PS3.
I started following this game from the very moment I heard it was made in collaboration of Studio  Ghibli  (to which I'm a massive fan).
You can tell straight away that the mark of Hayao Miyazaki is everywhere in this game; the world and characters are just full of this incredible magic.
The game hasn't come out yet so the game play and other part of the story are something that I can't say I have experienced, but something that I absolutely loved is that Level-5 did a great job on keeping the fidelity of the concept to it's maximum.
The game has some anime openings (which where to be expected) but during the game play the textures are just astonishing, as it keep at all moments and incredible amount of detail and the iconic charm of any Ghibli film. The cell shade works just fine, and even thought the characters could have done with a bit of more expressions, I really can't wait to get my hands on it and give it a go.


The Backwater Gospel

Came across this video on tumblr the other day called "The Backwater Gospel" and so far I've seen it easily over 20 times. 
It just happens to be an incredible piece of animation part of The Animation Workshop in Denmark and not only the animation itself but the style that it has makes me drool every time I watch it. 
A well done animation that it's aimed not for kids it's probably something that you dont see a lot, specially with the quality that this posses. 
Feast your eyes: 

Amazing isn't it! 
Well I was really glad to find the making off, and seriously would love to do a project with this level of character and definition in style. 
On the video I'll put below you can see the way they worked in facial expressions and how little details become incredibly important, like the little "pen strokes" that come off the silhouettes of mostly everything. Props and scenery just works in a perfect harmony. 
This video has cause a massive impact on me...seriously. It is actually making me think that this could probably be the way I want to take my dissertation project or at least a personal project, but for now, enjoy the process of the making of The Backwater Gospel. 


Colours of a robot

UV mapping Albus was more than a challenge, it was just time consuming. having all the little pieces separated made it easier, but still it took longer than what I expected. 
Most parts went out smoothly, but having to model the environment and UV map it at the same time made me not to be able to texture Albus until really late stages of the project. 
Also it was really hart to think of a colour that would suit him, and me being not so good with colour theory I ended up opting for a "typical" bronze scheme. 

Here's some of the progress images of Albuss texture: 

1.- just the UV map capture. 
 2.- The textures finally painted...took me ages to do it and I also put a small clover as a signature :)
3.- This is just an example image of the final render of Albus. Looking great and so happy :) 

This is just an idea that I thought could work (if we had more time). I wanted to make an occlusion render pass to the textures that would add a nice feeling to the textures, and probably help to give us a cartoon style with a bit of more complexity, but unfortunately this was just an attempt  the process was becoming a bit more complicated that what I expected, and it had to be done to every single object in the scene, so probably the rendering time would have double and the time for the deadline was just upon us. 


Skeleton and skin of an alien

So this is the part of the process that was the most complicated for me in an over all view. From the beginning having to think where the joints go sounds easy as we can reflect the joints that we have, but it is pretty easy to over look at some other movements that normally I wouldn't even consider as important (for arm roll and the clavicles for example).
At some point here I got left behind from the rest of the class as I understood something completely different in one lecture. Luckily I was able to catch up thanks to the video guides we had made.

After making the skeleton, we had to constrain them one another, think of a hierarchy in which the react in relation to the whole structure and identify key joints for certain movements. All this at the same time as making sure that everything was properly named and organized as any mistake at this point would be pretty dramatic and complicated to come back later on to fix it. After the joints where orient and parent constrained, we then moved to create some controllers or handles to avoid having to move the skeleton itself. Master control, jaw and a large number of NURBs circles where created and placed on position, making sure the pivot points were set on the appropriate joint.


The whole process itself was pretty intimidating, specially for the amount of detail that you have to put on. Also knowing that the next step was skin weight painting and that if anything was wrong with the rig, the only way to come back and fix it is to delete all work done in the weight skin process; now that put a lot of pressure to make everything right on the first go.

So after soft binding the skin to the rig, the big job of weight paint the skin come into place. This is basically to determine  how much influence each joint has over each vertex of the character. So it is a case of try and test; paint a bit, bend, see how react and modify according to the elasticity of the skin in relation of the deformation desire when animating. Long story short, it is hard work, and from this depends a lot of the final look of the character. This is why, after doing a big work on the weight skin painting it's really painful to find a problem with the rig that will cause you to unbind the skin, fix the skeleton, then bind it again and repeat the long process.

Albus Model

Finally starting with the modelling. I finished the final art work of him that helped me out to use it as a reference for the modelling stage. The reason why is on a blueprint form is because it is intended to be around the environment as a blueprint of his creation.


Making the model was a lot of fun. I think this is one of the part that I enjoyed the most, as is just eh idea of making something in the most poly-efficient and and that will eventually work with the rigging. 

Albus is compose of many many small parts, as any robot I assume. So I didn't combined them as he needed a more mechanical way of move and even thought we wanted a cartoon style, him bending like an organic character would look just wrong. 
This is the final model and a break down of its pieces. I did my best to keep him low poly as possible. but being a main character to the animation I probably could have used a bit more without compromising the rest of the scene. 

The concept of Albus


The character that I was in charge of modelling was the main robot. My initial idea was to make a "female" robot. Something that is not massively done, feminine, and agile.
By decision of the majority of the group we decided to stick to the "male" version of it, and we had ideas of different sizes and possible functions to it. Part of what we plan from this point was to just give it one arm; some point of focus that would cause it to be shut down and that the purpose of its function or existence would be part of the plot. For all we know we could have a massive cannon arm or shifting weapons that could lead to a very playable and dynamic game. 

                   
Also, being a steam robot that would ignite with a wind-up key give the main girl the connection, dependence and importance to another lever: he depends on her.
From this point we decided we wanted something way bigger than her, friendly looking and we like the idea of it having the a big tank on his back. From that point we came up with the final design of him.
This became his final concept. Here's and early stage of what could have been the first moment of interaction with the girl. Also we came out with names for both characters; the girl would be Tabitha and he would be A.L.B.U.S. (Automatic Lifting Bipedal Unit Solution)    

Moodboard of ideas

With some initial concepts that went from spies, mermaids, chinese zodiac and a few others, we decided to go for a steam punk theme but also with a stylised concept for the art.
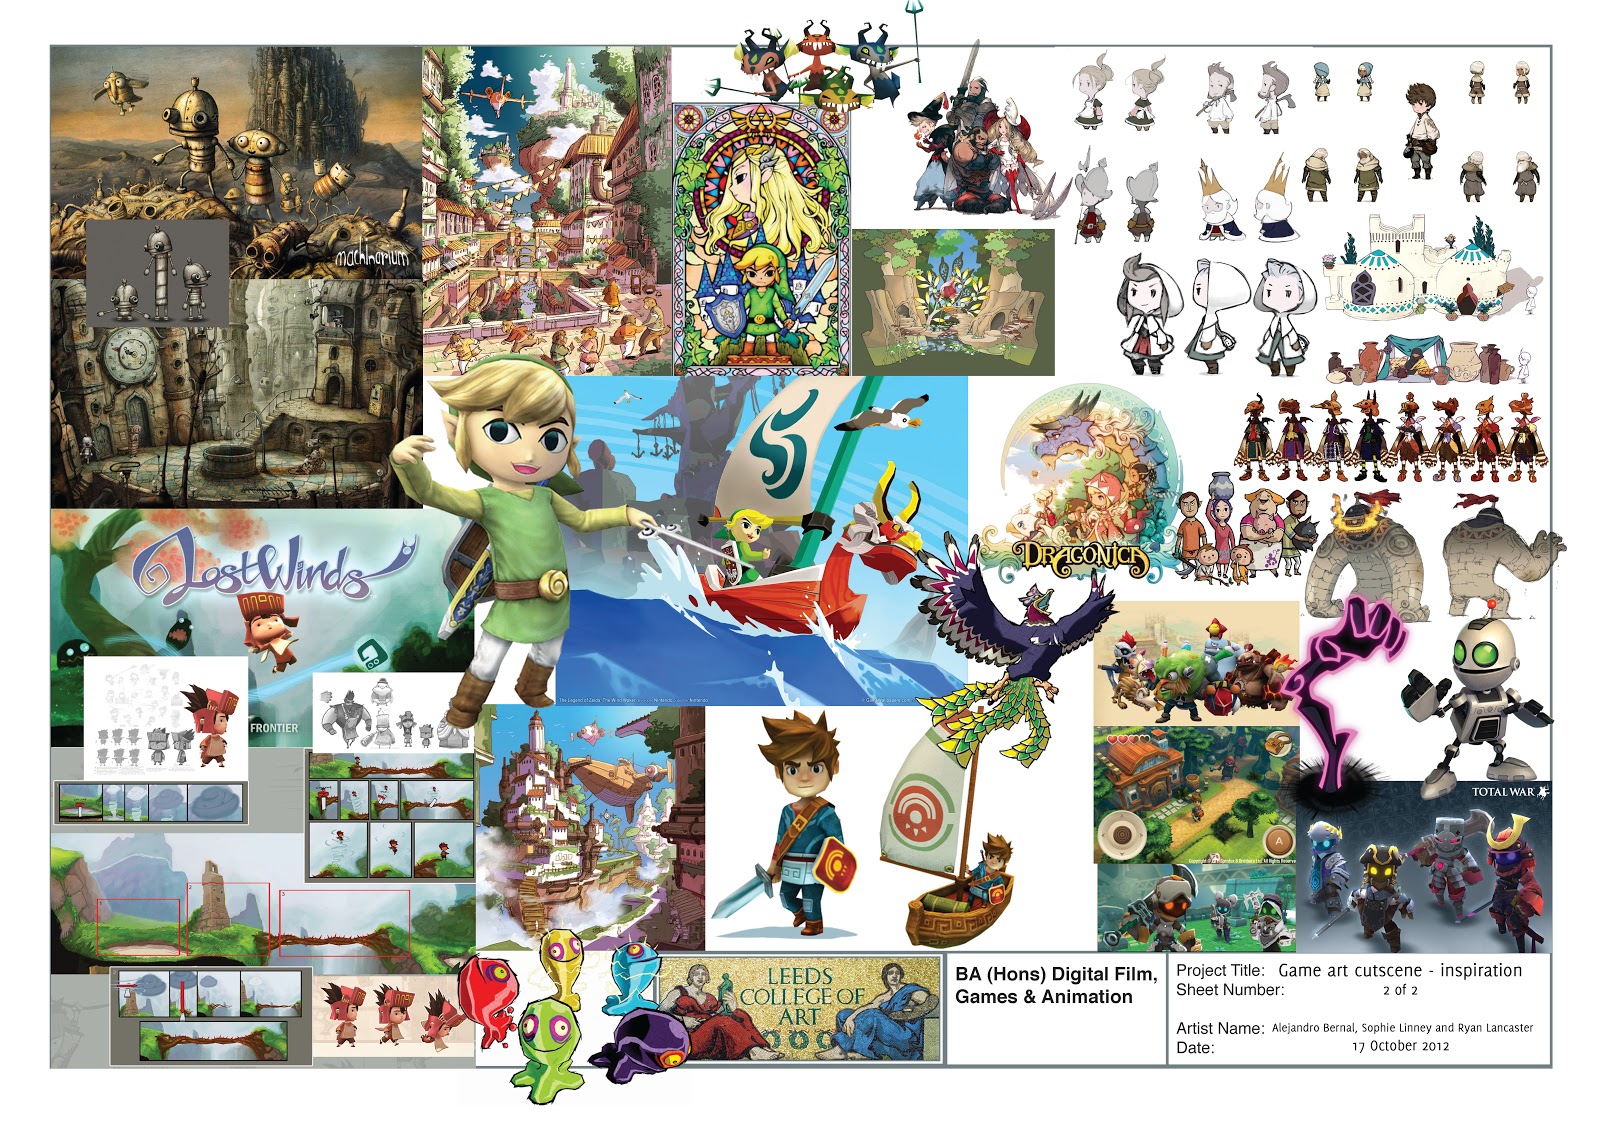
Our main inspiration I would say, was the game The Legend of Zelda: The Wind Waker. It has an iconic style for the saga, really heart-warming graphics and not mention the epic gameplay.
These is the moodboard that we came up with. It's a mixture of Machinarium, FF: four heroes of light, Lost winds and other few ones.

From there we looked at several other games in the same range. Knowing that we planned to add a robot character and a Victorian girl . Something characteristic of Steampunk is that is trying to imitate the functionality of a modern life without having the developed electricity to the actual stage and having coal and steam machines as their mayor source of energy. This can only mean one thing: loads of details.

15.10.12

Starting a game cinematic

As for our assignment of creating a cinematic using Unity3D as a base game engine, I ended up forming a group with Sophie  and Ryan. It's pretty exciting to work with them again as I know they're really talented and creative people, which more than intimidating me, I feel like I have to give my best to achieve quality standards and also to manage to produce something worth it for a portfolio. 
The three of us are pretty much wanting to try a bit of everything; feeling confident with strong points and at the same time trying to explore the parts on which we are a bit insecure. So to assign the roles basically ended up being quite beneficial (or at least that's how I see it) as we all get to bring to the table ideas about the same points and we get to choose or mix some of them to create a better one. 
Down side of this: it creates an extra effort for all of us to be doing the same thing as at the end the work gets basically done twice (or three times in this case). At this stage of coming up with ideas it all works out for the best as the more ideas we have, be more we get to explore different possibilities. Could it keep working like this for other stages like modelling, rigging and even animating? Who knows? For the moment being I couldn't help myself to create an excel working plan to try to keep things on track and more important, on time. (this is some of the many remaining of my architectural studies) 

This is something that we're all working on and will keep cha. As none of us is really good with communication I thought it would be easier to have everything in a written form to avoid confusions or misunderstandings.  Therefore we created a Facebook group and shared a folder on our Dropbox account to keep files and information flowing as much as possible. 
At least from my part I'll try to do my best and avoid dragging the group down.... and that would be much easier if it wasn't for this damn cold

Looking forward to show some of the sketches / ideas! 

Creation of an Alien

So getting back into Maya, our exercises now is to model, UV map, rig and animate an alien based on a reference t pose that we all got.
We also got some pictures that gave us an idea of how a good topology should look like for this model (mainly because there's not one definite solution).

I think the hardest part for me is to actually begin. After losing the fear of making mistakes I pretty much modelled the half of the character without too much trouble.
There where a few places where I had to go over and over. I was trying my best to get my head around the junctions like elbows and knees where animating could become a problem if it wasn't done properly.
I suppose this is what scares me the most: Having done a lot of work just to find out that I've done something wrong and having to go back and redo it. More than laziness I believe is something irrational about insecurities. I hope I can get over that in the future, but at on the bright side, I think I'm paying more attention to many details as I go along and learning to spot mistakes in earlier stages. (I have to the take out the positive of EVERYTHING) 


After that I just mirrored the geometry (fix some minor issues with the crotch) and VoilĂ ! we got a decent looking alien. It looks much better on the smooth version, but as long as it works along with the rigging the I'm happy about it.

After that and creating the bit of the inside of the mouth, I then moved to UV map it. Because of the Russian dolls project I feel a bit more familiar with UV mapping and I didn't struggle much other than splitting the head while maintaining the ratio of the eyes (for as bad as that sounds). 
It isn't mandatory to give it a texture in specific, as all that matters is to have a rigged and fully animated character by the end of this exercise, but I might give it a go just for the sake of it.